2015-10-21

X-Trans RAW files in ACDSee Pro 9

Recently ACDSee Pro was released in version 9. One of the new features is the support for Fuji cameras with an X-Trans sensor layout. Knowing that even Adobe did a pretty poor job with their first demosaicking algorithm for this kind of color filter array, and knowing that ACDSee still does a poor job with their demosaicking algorithm for Bayer color filter arrays I was curious about the performance of this new feature. So I downloaded some sample RAW files taken with a Fuji X-Pro1 and converted them using ACDSee Pro 9, Lightroom 5 and DCRaw to compare the results.

One of the first things that I figured out was that the comparison of the demosaicking performance would not be as easy as I thought. While ACDSee and Lightroom produce image files with 4896 x 3264 pixels, DCRaw created files with 4952 x 3288. It seems that both ACDSee and Lightroom crop the image, maybe to allow some distortion correction while still maintaining the same resolution (which is actually the same resolution as the camera itself delivers when shooting Jpeg). Only DCRaw seems to convert the whole captured image data. In my opinion it is a pity that both commercial products do not provide access to the whole captured data.
The above image is a 100% crop of the three converted images stacked and aligned in three layers in Photoshop. In order to enhance the images´ borders I added colored frames to them. The blue frame indicates the image from ACDSee, the green one is Lightroom and the red one is DCRaw. ACDSee´s and Lightroom´s images have the same size but they use a different crop of the original, that´s why the blue and green  frame don´t match. 

Another problem with comparing the images is that obviously Lightroom applies some sort of distortion correction to some images, even though lens corrections are disabled.

But anyway, let´s have a closer look to some critical details in the converted images and see if we can find some artifacts.

Test scene 1:
The image below shows a 200% crop of a detail of an image shot with the X-Pro1. The RAW file was converted with Lightroom 5, ACDSee Pro 9 and DCRaw (top to bottom). Because of the scaling factor it is pretty easy to identify artifacts. Beside that it is also easy to recognize that DCRaw has a different way of handling the colors (but this is nothing that I care about).

  • In the DCRaw (bottom) you can clearly see awkward colored pixels around the numbers, something that is called zippering. This was pretty common in simple demosaicking algorithms in former times. Modern algorithms for the Bayer array typically don´t produce much visible zippering artifacts. Due to the fact that X-Trans is much more complicated for demosaicking, zippering seems to be an issue again.
  • In the Lightroom conversion (top) there is no zippering at all. However, you can see that around the numbers the background is not as saturated as it should be. Lightroom applies a filter to reduce color artifacts but the price for that is washed out colors. Well, I have to admit that this is something that is barely visible at 200% and not at all visible at any zoom level lower than 100%.
  • The ADCSee conversion (middle) has a similar problem as the one from Lightroom, only here it is much stronger. There is a yellow border around the white numbers. Obviously they have applied a little bit too much false color reduction.
Test scene 2:
The next crop shows a scene from which you might think that it should be pretty easy to handle. It shows a part of the rails of a tram - these are typically straight and not fringed.

  • Lightroom (top) has no problems with this situation. The rails are perfectly smooth.
  • ACDSee (middle) fails. There are strong artifacts along the rail.
  • DCRaw (bottom) seems to do better than ACDSee. However, the image shows less contrast. Chances are good that artifacts would be more visible after some color correction and contrast enhancement.
Test scene 3:
A similar scene than the one before. The rear of a car with the rear window on top and some silver metal at the bottom. The differences to the scene before are that here we have
  • two solid areas (before it was just a bright line on dark background)
  • these areas are separated almost horizontally (the line before was skewed)
  • and the areas have high contrast
These are three factors which should make demosaicking easier.
  • Lightroom (top) perfectly separates the two areas. Nothing to claim here.
  • ACDSee (middle) fails again. Strong zippering is visible.
  • DCRaw (bottom) also shows strong zippering.
Test scene 4:
This time I only show a crop of an ACDSee image. It is taken from the very left side of the processed Raw file. As you can see there are extremely strong artifacts on the left side. Actually the border of the whole image looks like this (also check the image on top). There is a border around the image which is totally unusable. So, in fact you would have to crop the outer 16 pixels from all your converted images (I have tested this with some more images, it is the same with all of them)
In this case I wouldn´t even call it a bad algorithm but rather a bug which they should fix as soon as possible.

Conclusion:
I could continue with hundreds of examples, all showing the same thing: ACDSee´s Raw converter is not competitive. One could say that what I do is pixel peeping and not really relevant for photographers. Actually I agree that it is pixel peeping. Designing image processing algorithms is one of my hobbies and I believe it should be the ultimate ambition of companies like Adobe and ACD Systems to create the best performing algorithms. ACD should not be satisfied with being able to process X-Trans files, they should rather do their best to get the best out of these files. Well, it seems that they have different priorities. Regarding the relevance for photographers I have to say that I believe that image quality (even on a pixel level) is important for them. Why would I decide to by a 24 megapixel camera if I don´t care about the pixels and why would I decide to shoot in Raw if I then use a tool which does not get the best out of these files? If I didn´t care, I could use my smart phone...


2015-10-10

ACDSee Pro 9 short review

I just realized that the ACDSee software suit has a new version. ACDSee is now available in version 19, Pro and Ultimate in version 9. Since I´ve used ACDSee Pro earlier, I am most interested in seeing how Pro 9 performs and what new features it brings.

JPEG display
From my older posts you might already know that one of my biggest concerns is how ACDSee renders JPEG images with chroma subsampling. This was actually the first thing I tested in the new release. Here´s an example:

Download the following image to see a bigger crop.

The left side shows a 100% crop of a Jpeg filedisplayed in Windows´ own photo viewer. The right side shows the same crop of the same file dispalyed in ACDSee Pro 9. You can clearly see that the border between the red and the blue Lego bricks is rendered smoothly on the left side. On the right side, however, some ugly staircases are introduced.
Obviously they havn´t updated their Jpeg decoder at all (I did´t really assume they would).

Now, what new features does ACDSee Pro 9 bring? On their website you will find the complete list of new and enhanced features, which are:
  • action recorder
  • lens correction profiles
  • collections
  • photo mode
  • 4k support
  • snapshots
  • a dehazing tool
  • skin tune tool
  • support for photoshop plugins
  • new filters
  • color matching tool
  • conversion tool for Lightroom databases
  • enhanced gradient tool
  • updated RAW support
  • Microsoft OneDrive integration
Quite a long list of new features. To be honest, I´m not really interested in all of them and I will not test them in detail. But some of them actually sound very promising.

Action Recorder
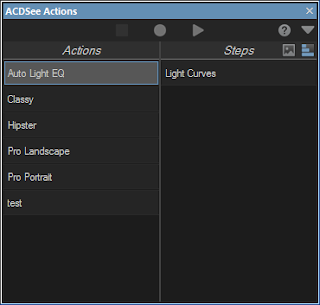
In Edit mode there is now an additional Window which allows you to record and play back actions. An action in this context is a set of corrections/modifications which are applied to an image. The new feature allows you to apply the same corrections to multiple images with ease. 
For those who work with the Edit mode, this might be a useful feature. However, I have to say that I use the Edit mode very seldom. I use Develop mode to tune my images and that´s it.
The first test of the action recorder showed that it is quite easy to use. When you first enter the Edit mode the new window is displayed by default (you can hide it if you want) and there are already some Actions in there.
By selecting an Action on the left the Steps included in the Action are displayed on the right. You can also switch do display a preview instead of the steps. Operating this dialog is pretty intuitive.

Lens Correction Profiles
This is one of the features which I missed the most in older versions of ACDSee. When you come back from a shoot and have 3000 images to process then amnually correcting CA on every image is something I would rather not do. Unfortunately up to version 8 there was no other way than doing it manually (well, I guess you could store development settings for all your lenses at all focal lengths).
The new feature can be found in the Geometry tab in Development mode.
When you navigate there, you´ll find that the Camera is automatically identified correctly (Make and Model) but it´s still possible to manually change the setting. I guess this can be useful if your camera is not on the list so you can select one that has similar properties (e.g. the same sensor size). The lens, however, was not identified in any of my tests. Even though the used lens is on the list of available lenses, you still have to manually select it from the list. You can then store the assignment so that for new images using the same camera/lens combination the same profile will be used. There´s also a dialog in which you can manage your stored default assignments.
Correction of distortions and chromatic aberration can be activated independently. However, CA correction is not available for all the lenses which are in the database. Unfortunately it seens that CA correction is not available for all of my tested camera/lens combinations, which are:
  • Canon EOS 6D, Canon EF 24-105mm f/4L IS USM
  • Canon EOS 60D, Canon EF-S 24mm f/2.8 STM (this lens is not available at all)
  • Canon EOS 60D, Canon EF 50mm f/1.8 II
  • Canon EOS 70D, Canon EF-S 18-135mm f3.5-5.6 IS STM
CA correction was available for those combinations:
  • Canon EOS 6D, Sigma 35mm f/1.4 DG HSM
  • Canon EOS 6D, Canon EF 50mm f/1.8 II
  • Canon EOS 60D, Sigma 35mm f/1.4 DG HSM
  • Canon EOS 60D, Canon EF-S 18-135mm f3.5-5.6 IS
I havn´t done comprehensive testing of the quality of distortion and CA correction. However, what I found during my testing is that the performance (rendering speed) is rather poor. When the image is dispalyed at 100% after activating CA correction it takes about 10 seconds before the image is rendered again (I use an Intel Core i5-2500K 3.3GHz, 8GB RAM, no extra graphics board). Operation is generally blocked during that time. If you still try and click buttons or move the image crop, you may see some strage artifacts.
I have to say, that I find this noew feature a little disappointing because not all my lenses are supported, especially when talking about CA correction, which is the most important correction in my opinion. Typically I don´t care that much about pincushion an barrel distortions because they are not so obvious and distracting when you view an image. But CA is something that is really annoying and should be corrected.

Collections
If categories, keywords, colors and ratings are not enough to tag your images, then you can now also use collections. As far as I have seen, the behaviour of collections is pretty similar to categories. You can assign you photos to one or more collections and then you can use this for filtering.


However, it seems that collections are not available in selective browsing (selective browsing is a tool to combine filters of different types, e.g. time filter, category filter and folders). It is also not possible to dispaly the content of multiple collections at once.
What might be useful are the smart collections. They allow you to use the images´ metadata to automatically assign them to collections. The rules can be freely defined in a dialog

Photo Mode
This new way of presenting images is similar to popular image viewing apps for tablets and smart phones wher you´re presented with tiny thumbnails of all images which are stored on a device. You may select to group the images by year, month or week. Clicking on an image will zoom in.
I rather use the old fashioned way of navigating to certain images via a folder structure, but I can imagine that the photo mode is something that is very appealing to a lot people.

Dehazing Tool
Because of a lack of useful test images I couldn´t really test this feature. However, what I saw is that is is only available in Edit mode which I don´t understand at all. Why do they only allow to use dehazing for destructive image editing but not in the non-destructive Development mode?

Skin Tune Tool
A new tool which allowes to smoothen the skin in protraits. It looks pretty similar to reducing clarity but the correction will not be applied to the whole image but only to the regions which ACDSee identifies as faces (or skin). This seems to work pretty good. I only found that in protraits it will also smoothen the lips which will look unnatural.
The biggest disadvantage of this tool is (same as with the dehaze tool) that it is only available in Edit mode.

New Filters
Is there really anybody who uses these filters?

Updated RAW Support
They say they´ve added the support for additionl RAW formats/cameras including Fuji cameras with X-Trans sensor. Well done! It took only about five years before ACDSee finally found a way to support these cameras. Actually I believe it´s not ACDSee who made it possible as they don´t have their own demosaicking tool but use DCRaw instead. The quality of ACDSee´s new X-Trans demosaicking is yet to be tested, but as far as I´ve seen, the quality of its Bayer demosaicking is unchanged (refer to one of my older posts).


2015-06-19

Which Raw converter does the best demosaicking?

Below are some details of images which I captured in Raw format and converted with different programs (ACDSee Pro 6, Canon Digital Photo Professional, Lightroom 5, Raw Therapee V4.0 with "amaze" algorithm). The goal was to identify differences in their demosaicking algorithms and quality.
In order to get comparable results I set sharpening to 0 or turned it off in all programs. I also turned off chromatic aberration correction to really reduce the image processing to a minimum.
The images were shot at an oldtimer show in Salzburg, Austria on a Canon 60D (no the newest model, but sufficient for this kind of test) with an EF-S 24mm F2.8 lens.
In all scenes you will find the ACDSee image in the upper left corner, the Canon DPP image in the upper right corner, the Lightroom image in the lower left corner and the Raw Therapee image in the lower right corner.

In this scene you can see how skewed lines are processed. The headlight of the car (a Jaguar) is in perfect focus. You can clearly see that ACDSee tends to create blocks of 2x2 pixels at lines at an angle of roughly 45° (staircasing). If you zoom in a bit you can even see some pixels which are obviously too dark (overshooting) at the upper left side of the headlight mount. 
Raw Therapee shows some color artifacts all over the headlight. This crop is close to the center of the image, but still this could be due to chromatic aberration. Even though sharpening is turned off, the image looks unnaturally crisp.
DPP seems a little blurry but free of artifacts. 
Lightroom has a good balance of sharpness and artifacts. If you look close enough you will find some color artifacts, but less than in the Raw Therapee image and also some blocky skewed lines, but not as bad as in the ACDSee image. 

This scene shows a similar situation, only this time there is more contrast, which makes the artifacts visible even more. The crop is taken from the upper left third of the image, so chromatic aberration is noticeably stronger than in the crop before. 
ACDSee can´t handle this situation at all. This image looks awful.
DPP smoothens out the CAs and creates a nice smooth image.
Again, Raw Therapee struggles with colors and Lightroom is somewhere in between. While artifacts (color and blocking) are visible, the image is sharper than canon´s.

This is a part of the image which is slightly out of focus. Sharpness is is not a big topic in this scene. Normally you would think that this makes demosaicking easier, but obviously this is incorrect. 
Again, ACDSee fails in reproducing skewed lines. The creases in the man´s shirt show heavy staircasing and look awful.
Raw Therapee can handle this situation better, even better than Lightroom which also shows some light staircasing.
Canon DPP is the clear winner in this scene. The image is very smooth.

Similar situation than in the second image. Again, Canon and Adobe are the winners, ACDSee and Raw Therapee struggle with the high contrast skewed edges.

Another situation where ACDSee clearly fails. Skewed lines and edges are obviously not its strength. Raw Therapee can handle this situation much better, however, it shows color fringes again. Lightroom has some staircasing and color fringing as well. DPP has less sharpness but no artifacts at all. 

This is a very interesting image. Red detail on black background is a difficult thing to handle for demosaicking algorithms because there is no information that can be extracted from the green channel which could support the interpolation of the red channel. 
ACDSee fails in this test even worse then ever before. There are bright pixels in the red lines which look like a pearl necklace. This is due to overshooting in the interpolation of the missing pixel values.
In Raw therapee the two parallel lines can be clearly separated, but they look somewhat "digital". If you zoom in you can see that the red lines seem to be stitched together from pieces of 45° lines.
When you zoom in you will also identify some overshooting and pearl necklaces in the Lightroom image but by far not as bad as in the ACDSee image.
The DPP image does not separate the two parallel lines as good as the others, but again, it looks less processed and more natural.

In general it seems that Canon does not put so much detail into the image, but therefor the images are completely free of demosaicking artifacts. This means that the images look very natural and not digital, even when you zoom in. The other three programs produce very crisp images, even with sharpening turned off. This makes the pixes sturcture visible and creates a "digital look". Also it allowes interpolation artifacts to be more pronounced.

After having analysed these (and some more) test images, my rating is the following.
1) Canon Digital Photo Professional
2) Adobe Lightroom 5
3) Raw Therapee V4.0
4) ACDSee Pro 6

I have to emphasize once more that this rating is just about the quality of the demosaicking. It does not take into account other features of the tools. Also, obviously, the selection of the tools is by far not complete. The reason why I tested exactly these four is just because I have them. I bought ACDSee some time ago. When I figured out that it´s image quality sucks, I bought Lightroom. And well, Raw Therapee is for free and DPP came with the camera anyway. 

If you like, please post your opinion and your own experiences.


2015-05-03

"A Novel Color Filter Array and Demosaicking Algorithm for Hexagonal Grids" published

It took quite a while but now our paper "A Novel Color Filter Array and Demosaicking Algorithm for Hexagonal Grids" is online at SPIE. Follow the link to download it.

The main idea presented in this paper is to replace the square grid, which is typically used in digital imaging with a hexagonal grid. This alone is not a new idea, there have been people in the past who thought about using hexagonal pixels. However, we also propose a color filter array for such a grid. Remember, color filter arrays are used to make an image sensor capture color images, by letting every single pixel capture only one of three primary colors. And because this alone is not very helpful, we also provide a demosaicking algorithm for this CFA.

So here´s our CFA:
Hexagonal Color Filter Array

As you can see, its color distribution is very different to that of the Bayer pattern. 6 out of 9 pixels on our grid are green, which allows for very good luminance interpoaltion, without using cross-channel information. There are quite few red and blue pixels on our grid. This does actually not matter in most cases as we can use cross-channel information for the interpolation of these.